This article is for people who dual-boot Linux with Windows, or boot multiple Linux distributions. If you use GRUB for booting multiple distributions and have never heard of rEFInd then this article is for you.

I came across rEFInd five years ago, and it was one of those things that solved a lot of headaches for me. Many years later, I’m often surprised by how few people are aware of it, and how many people still struggle with GRUB for booting their Linux systems.
GRUB is the default on all major Linux distributions in order to keep compatibility with older computers that don’t have EFI. If you have a desktop or laptop that was manufactured in the last 10 years, then it comes with EFI, and there is absolutely no reason to be using GRUB.
This article describes how we can create a multi-boot system using EFI boot, and use Refind to switch between systems. If you already have a computer with multiple Linux distributions installed in EFI-mode, then you can skip to the section for installing Refind.
Basics
Boot loaders and Boot managers
A boot loader loads an OS kernel into memory and executes it. A boot manager hands off control to another boot program. GRUB is both a boot loader and a boot manager. Refind is only a boot manager.
We don’t need the GRUB boot loader on EFI-based systems, since an EFI-boot loader stub is built into the Linux kernel itself. All we need is a boot manager to hand off control to the Linux kernel that we want to boot. The Linux kernel will then load itself into memory and execute, instead of depending on an external boot loader like GRUB.
UEFI and BIOS
rEFInd is a boot manager for computers that use EFI/UEFI (Unified Extensible Firmware Interface). If you have a laptop or desktop that was manufactured in the last 10 years, then it uses EFI instead of BIOS. Both EFI and BIOS are low-level software that acts as an interface between the operating system and the firmware on the motherboard. The firmware on your motherboard is another low-level software that controls hardware components.
BIOS was developed in the 1970s and was prevalent till the late 2000s when it began to be gradually replaced by EFI. BIOS provides a basic text-based interface. EFI on the other hand can provide a complete graphical environment with support for mouse and graphical controls.
In order to provide backward compatibility, most EFI systems provide a Legacy Boot mode that can be used to boot your computer.
GPT Partition Table
In order to use a new hard disk or SSD with UEFI, create a new partition table on the disk in GPT format.


GPT (GUID Partition Table) is a new partition table format used with EFI systems. It is a modern replacement for the old MBR partition table (Master Boot Record) that was used with BIOS systems. You can create a GPT partition table using GParted or any other disk partitioning tool.
- MBR supports only 4 primary partitions, or 3 primary and 1 extended partition (that can be further subdivided into more partitions). GPT supports creation of more than 128 partitions.
- MBR partition size is limited to 2 TB. GPT partition size is limited to 8 ZB (Zetta-bytes).
- GPT provides a unique UUID (called PARTUUID) and a label (called PARTLABEL) for each partition. These are stored in partition table and are different from the normal UUID and LABEL that are stored in filesystem.
- PARTUUID is always unique. PARTLABEL is empty and needs to be set manually. These are stored in partition table and do not change when partition is re-formatted.
- UUID and LABEL are stored in the file-system and change when the partition is re-formatted.
You can refer to devices with their PARTUUID and PARTLABEL to ensure that device references remain valid, even if the partition is re-formatted.
In Linux, the device files are referenced as:
/dev/disk/by-partuuid/<partuuid>and/dev/disk/by-partlabel/<partlabel>. You can use these almost everywhere (in /etc/fstab, crypttab, etc) instead of using device names and UUIDs.
EFI System Partition (ESP)
UEFI requires every bootable disk to have a special partition called EFI System Partion (ESP). The ESP is a simple FAT16 or FAT32 partition with partition flags – boot and esp. You can set flags on a partition using GParted or any other disk partitioning tool.
ESP will store EFI-executable files which are small in size. Even though 100 MB is more than enough for ESP, many Linux distributions (like PopOS) will refuse to install unless the ESP is at least 500 MB in size. This is quite wasteful as only 30 MB of space is actually needed.
We will create a 500 MB ESP in order to avoid problems with installation.


Creating System Partitions
Create partitions for installing Linux distributions. I created 3 partitions for installing Ubuntu, Manjaro, PopOS, and a data partition for storage.

GPT allows you to assign a friendly name (or label) to each partition which you can use to access the partition in Linux.


See the “xps-data” partition above? You can access the device in Linux using:
/dev/disk/by-partlabel/xps-dataThis is a much better way of accessing the device than using UUIDs or device names. Device names like /dev/sda3 can change if you have multiple disks connected. UUIDs will change when you reformat the partition. Unlike file system labels which are lost when the partition is formatted, the partition label will never change.
After you install Linux, you can add a line to your /etc/fstab file to mount the “xps-data” partition to a fixed path:
/dev/disk/by-partlabel/xps-data /xps-data ext4 defaults 0 0You can view UUIDs and labels with the lsblk command:
lsblk -o NAME,FSTYPE,PARTLABEL,PARTUUID,LABEL,UUID /dev/sda
Installing Linux
We are going to install 3 Linux distributions (Ubuntu, PopOS, and Manjaro) and then install Refind as boot manager.
Download a copy of Ubuntu ISO. Write it to a USB drive and restart your computer.
Press F11 or F12 (depends on your system) to show available boot devices.

You will see 2 entries for each device in the menu. One for BIOS-mode and one for EFI-mode (Prefixed with “EFI:” in the above image).
**** Select the option to boot USB drive in UEFI mode ****
This step is critical. If you select the wrong entry and boot the USB drive in BIOS mode then your Linux system will be installed in BIOS mode. You will be able to boot the ISO, run the installer, and install Ubuntu to disk but when you start your computer it will not boot. This is because the BIOS version of GRUB has been installed (package grub-pc) instead of EFI version (package grub-efi-amd64).
Installing Ubuntu
Run the Ubuntu installer and install Ubuntu to the “xps-ubuntu” partition. Don’t select the “Format” option for any of the partitions unless you wish to change the file system format.


Repeat the same process for installing Manjaro and PopOS to the “xps-manjaro” and “xps-pop” partitions. Each operating system will install its own version of GRUB-EFI which will overwrite the previously-installed boot loader. PopOS uses Systemd-boot instead of GRUB. It doesn’t matter which boot loader gets installed as we will install Refind and remove everything else in final step.
Note: While installing multiple distributions you can allow the installer to reformat the ESP partition. Since we are going to use Refind, we don’t need any of the files that gets installed on ESP.
Installing Manjaro


Installing PopOS


Installing Refind Boot Manager
Once all 3 systems are installed, boot into Ubuntu or PopOS and install Refind.
Refind is included in official repositories of all major Linux distributions. You can install it from a command window:
sudo apt update
sudo apt install -y refind
Refind will display a prompt for installing itself to ESP. Select YES to finish the installation.


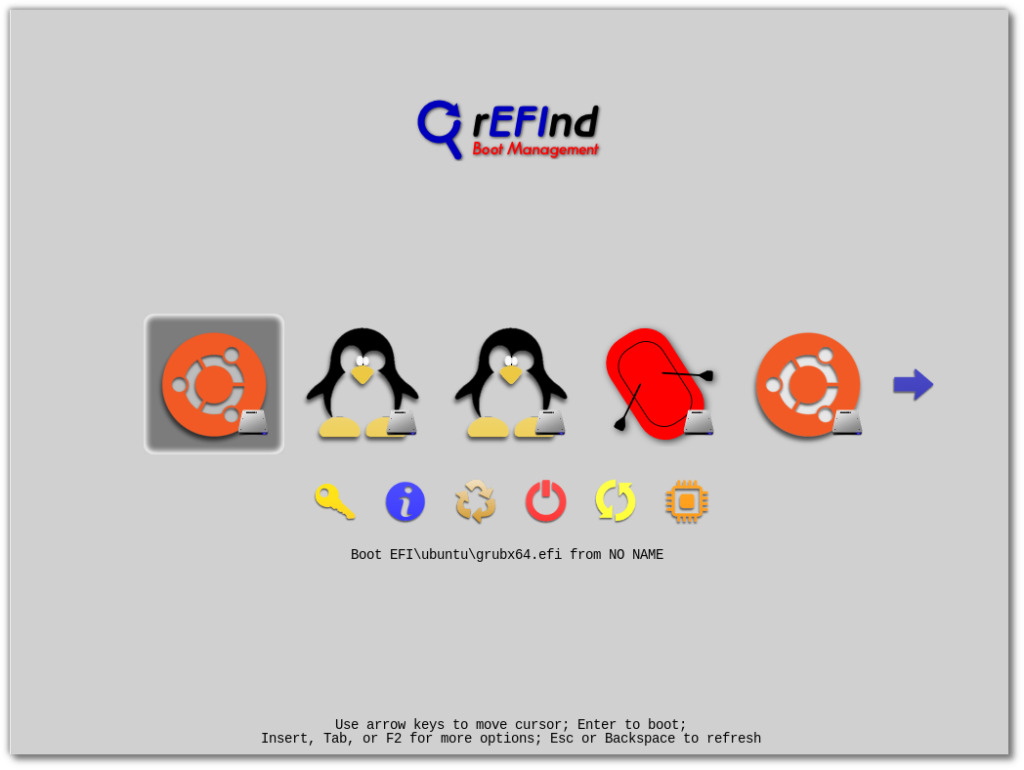
Restart the system. You will be greeted by Refind boot manager screen.
Cleaning Up
As you can see in above screenshot, the boot screen is quite crowded. Refind will show boot entries for any EFI-executable or kernel that it finds on any partition. If a Linux system has multiple kernels installed, then Refind will add a boot entry for each kernel. For each entry you can see file path of the EFI-executable or kernel that it will boot.
We will hide entries for .efi executables that are installed in ESP. To hide an entry, select it with arrow keys on your keyboard, and press Delete.


Now we are left with 3 entries for the 3 Linux distributions that were installed. Under each icon, you can see the kernel filename and partition name.

To customize the icons for Manjaro and PopOS, simply copy the icon that you want to use, to the root of the system partition. Rename it to .VolumeIcon.png. Refind supports PNG, JPG, BMP, and ICNF icons.


Refind Themes
Refind has a large selection of community-made themes that can be installed manually. Some of the popular ones are shown below.


We are going to install a theme named Regular. Run the following command in a command window:
wget -O - https://raw.githubusercontent.com/teejee2008/scripts/master/install-refind-theme-regular-light.sh | bashRestart system to see changes.

To install the Dark variant:
wget -O - https://raw.githubusercontent.com/teejee2008/scripts/master/install-refind-theme-regular-dark.sh | bash
Freeze GRUB
Even though we have installed refind we are not finished. GRUB is still installed on the 3 Linux distributions. During package upgrades, GRUB will make itself the default boot loader. Since GRUB is so deeply integrated with every Linux distribution, it is not possible to uninstall GRUB without breaking the system. We will place a hold on GRUB packages so that it does not update. This needs to be done on each system.
On Debian / Ubuntu-based distributions:
sudo apt-mark hold grub-efi-amd64 grub-efi-amd64-signed grub-common grub-efi-amd64-bin grub-common grub2-commonIf by some chance GRUB makes itself the default boot loader again, you will need to run the following command:
sudo refind-install
Booting LUKS-Encrypted System
If you have a LUKS-encrypted system, you need to tell refind how to find the root partition.
Create a file named refind_linux.conf in root of boot partition.
"Boot with standard options" "root=UUID=80c1b568-6346-4a3d-9916-d0000b085cca cryptdevice=/dev/sda2:cryptroot:allow-discards ro rootfstype=ext4 quiet splash vt.handoff=7"Change the UUID and device name to match the encrypted system partition.
Summary
The beauty of Refind is that it installs itself to ESP and is independent of any operating system that is installed on the computer. We don’t need to fool around with GRUB configuration files and we don’t need to worry that our boot configuration will break if we make changes to the installed OS.
Refind is also useful for booting different kernels. GRUB always boots the latest kernel for each Linux system and changing the default kernel can be a painful process. With Refind you always get a boot entry for every kernel that is installed. If you face issues after updating the kernel, you can select and boot an older kernel from the Refind boot screen. Refind remembers the last selection, so the last-selected entry is selected by default when you restart the computer.
Refind works well with Windows and macOS as well. Windows has it’s own EFI-based boot loader that is installed on Windows partition and will be detected by Refind.
rEFInd also works with BSDs (Berkeley Software Division) like GhostBSD 20.08 (from Ghostbsd.org) This would allow you to boot multiple Linux and GhostBSD. I appreciate your writeup Tony George. Thank You for providing details steps to follow and including pictures. I can use this blogpost information to make a multiple partition GPT formatted hard disk with Linux (Manjaro.org, Puppylinux.com ) and GhostBSD for running tools that I need for my work flow preferences.
I will look at Ernst Renner’s use of TimeShift tool and his favorite bootable USB ArcoLinux B. Since ArcoLinux B is a minimal ISO. https://arcolinuxb.com/ https://arcolinux.info/download/
https://www.ernstrenner.com/failed-to-start-load-kernel-modules/#more-1323
My preference is PuppyLinux.com version FatDog64 811 Release https://distro.ibiblio.org/fatdog/web/
PuppyLinux FossaPup version 9.5 is just out in September 2020.
That’s cool!
I’m going to try it out running Linux Light, UMix, and Twister OS.
Pingback: UKUU 21.05 – TeejeeTech